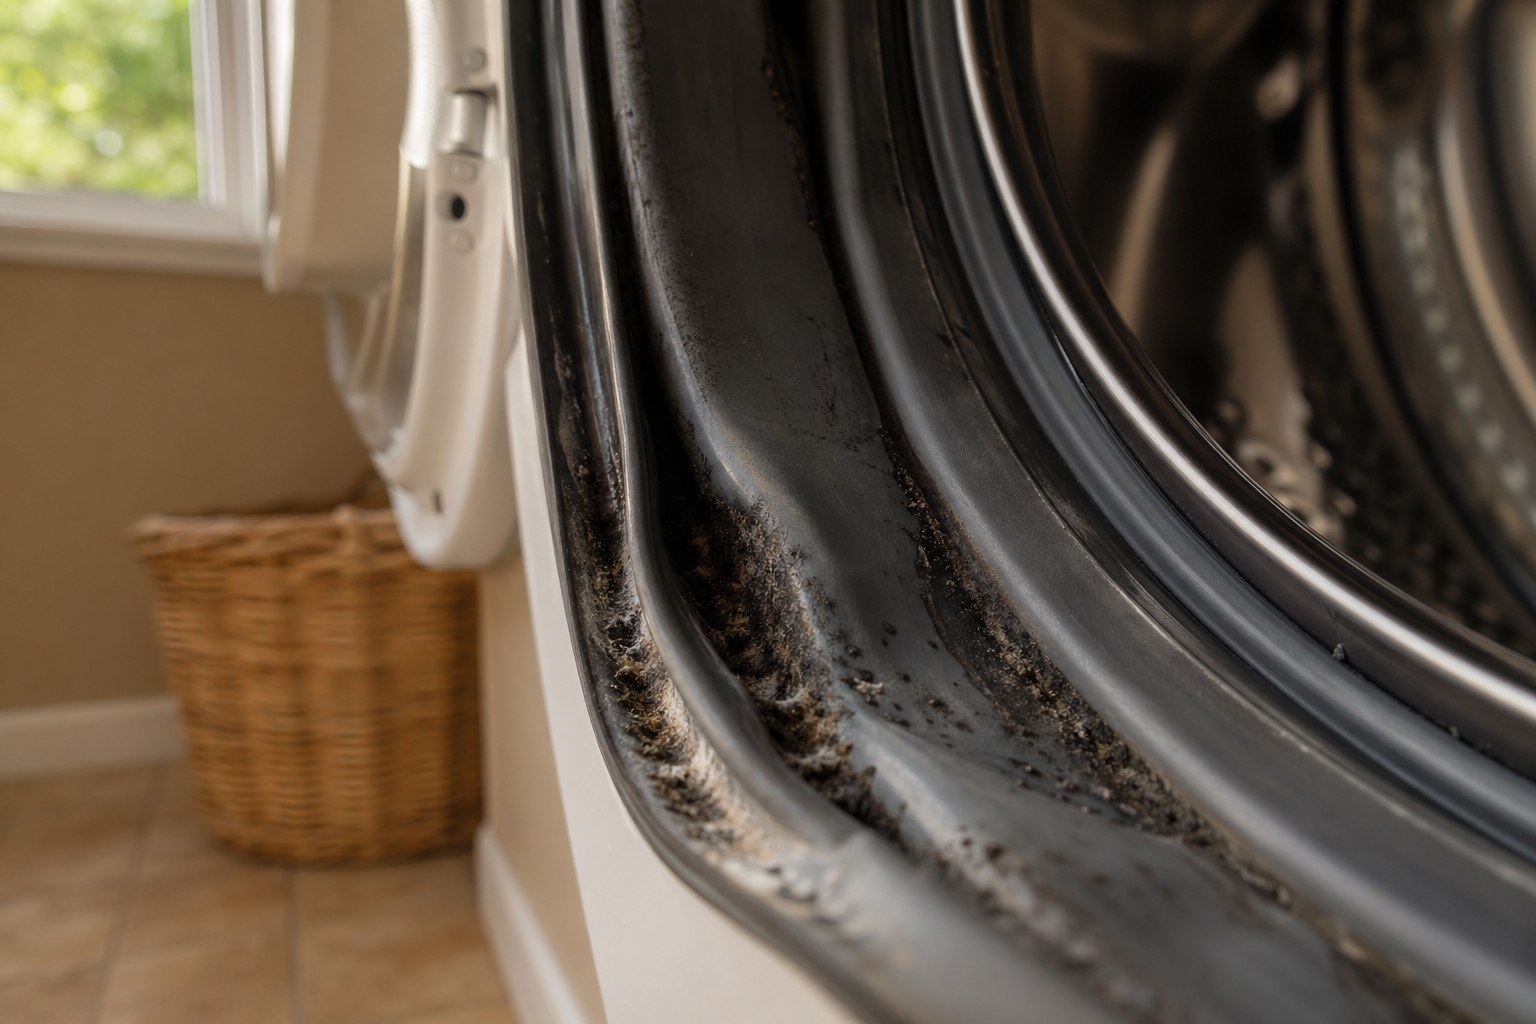
You pulled clean laundry out this morning and the towels still smelled like a damp basement — or you finally looked inside the front-loader gasket and saw the black streaks running through every fold. You are not imagining it, and you are not alone.
Consumer Reports surveyed 94,473 of its members and found that 17% of front-load washer owners reported mold problems, compared to just 3% of top-load owners. Only 30% said they were able to fully eradicate it. Five major manufacturers settled class-action lawsuits covering more than 11.5 million units. This is a known design issue, not user error.
Sarasota’s average relative humidity sits at 74% year-round, with monthly averages ranging from 69% to 78%. Mold begins growing when humidity climbs above 60%. Most laundry rooms in Sarasota never drop below that threshold, even with the AC running. Washer mold here is not a once-a-year deep-clean problem. A slow leak behind or under the machine can colonize the laundry room floor, the subfloor, and the lower drywall within 24 to 48 hours.
This guide walks through how to clean mold from a washing machine for both front-loaders and top-loaders, explains when cleaning is futile and the gasket needs replacement, helps you spot mold spread beyond the machine itself, and tells you when it is time to call a Sarasota-area mold remediation contractor.
Step 1: Identify What Type of Mold You’re Dealing With
The most dangerous moment in your laundry routine is when you open the front-loader door — your face is inches from the drum and airborne spore concentration peaks.
Three mold species dominate inside residential washing machines:
- Aspergillus — the most common species in laundry appliances. Triggers allergic reactions and can cause respiratory infections in immunocompromised people.
- Penicillium — fast-spreading, blue-green, often visible inside the gasket folds. A common asthma trigger.
- Stachybotrys chartarum — the species commonly called black mold. Appears when leaks have already spread to drywall or subfloor and produces mycotoxins.
Bacteria coexist with these molds. Pseudomonas, E. coli, and Klebsiella are routinely cultured from washer biofilm, which is why mildewy laundry can cause skin irritation even when the clothes look clean.
The EPA and the Institute of Medicine have confirmed sufficient evidence linking indoor mold exposure to upper respiratory symptoms in healthy people, worsening asthma in people who already have it, and hypersensitivity pneumonitis in susceptible individuals.
Visual cues to look for before you start cleaning:
- Black or green slime in the gasket folds of a front-loader
- Pink or orange film inside the detergent dispenser drawer
- White powdery patches under the lid or rim of a top-loader
- A musty smell on laundry that should be clean
- Water spots, staining, or pooled water on the floor under or behind the unit
Warning: If anyone in the household has asthma, COPD, is pregnant, immunocompromised, under 5, or over 65, treat this as a high-priority issue. Have someone else handle the cleanup, or skip the DIY route entirely.
Step 2: Clean the Front-Load Washer Gasket and Dispenser
Roughly 80% of front-load washer mold lives in one place: the folds of the rubber door gasket. Clean the gasket correctly and you have solved most of the problem. Skip it and no amount of bleach in the drum will help.
You will need:
- Nitrile or rubber gloves
- An N95 mask
- Microfiber cloths and paper towels
- An old toothbrush
- A spray bottle
- One cleaning solution (do not mix)
Pick one cleaner based on how heavy the mold growth is:
- Bleach — most effective for heavy visible mold. Mix 1 part bleach to 4 parts water. Dwell time 5 to 10 minutes.
- Hydrogen peroxide — a strong middle option. Mix 2 cups water, half a cup of 3% hydrogen peroxide, and a quarter cup of lemon juice.
- White vinegar — for light mildew only. Use a 50/50 mix or 1 part vinegar to 4 parts water.
Steps:
- Open the door fully. Pull back every fold of the gasket. Mold hides in the lower curve where water pools after every cycle.
- Spray your chosen solution into every fold. Let it dwell 5 to 10 minutes.
- Scrub the folds with the toothbrush. Wipe everything out with paper towels and discard them.
- Move to the door glass and the door frame and repeat.
- Pull the detergent dispenser drawer all the way out. Soak it in hot soapy water for 15 minutes, scrub the inside of the drawer cavity with the toothbrush, rinse, dry, and reinstall.
- Wipe the interior glass and the outer rim of the door.
- Run a hot empty cleaning cycle (covered in the next step).
Tip: Front-loader mold almost always originates in the lower gasket pocket at the 6 o’clock position. Use a flashlight and pull the rubber back firmly — you will find a pocket of standing water and biofilm there.
Warning: Never combine bleach and vinegar (chlorine gas) or bleach and ammonia (chloramine vapor). If you switch products, ventilate the room for at least 30 minutes between applications.
Step 3: Run a Hot Cleaning Cycle — Front-Load and Top-Load
A clean gasket means nothing if the drum, pump, and inner tub are still colonized. The hot cleaning cycle reaches what your hand cannot.
For a front-loader:
- Add to the empty drum: 1 cup of bleach OR 2 cups of white vinegar OR one Affresh tablet
- Use the Tub Clean, Self Clean, or Sanitize cycle if your machine has one. If not, use the longest, hottest cycle available.
- After it finishes, run a second short hot rinse cycle to flush any residue, then wipe the drum interior dry.
For a top-loader:
- Top-loaders are not immune. Mold collects under the rim, around the agitator base, and in the bleach dispenser.
- Set the highest water level, hottest temperature, and let the tub fill completely.
- Add 4 cups of white vinegar OR 1 quart of bleach. Not both.
- Let the agitator run for 1 to 2 minutes, then pause the cycle and let the tub soak for a full hour. This soak is the step most homeowners miss, and it is the one that actually kills the biofilm.
- Resume the cycle and let it complete.
- For HE top-loaders, follow the manufacturer’s tub-clean process exactly — over-sudsing in an HE machine creates its own problems.
After every cleaning cycle, regardless of washer type:
- Wipe the drum, gasket, and door dry with a microfiber cloth.
- Leave the door or lid open at least 4 to 6 inches for the next 4 hours minimum.
- Pull the detergent dispenser drawer out an inch and leave it cracked open.
Tip: Manufacturer guidance is a 90-day cleaning cadence. In Sarasota’s humidity, that is too infrequent. Run a hot cleaning cycle monthly and you will rarely need a deep scrub.
Step 4: Decide if You Need to Replace the Gasket — Not Just Clean It
If you have cleaned the gasket twice and the mold came back within two weeks, stop scrubbing. The rubber itself is the problem, and no cleaner reaches inside cracked or biofilm-bonded rubber.
Replace the gasket if any of these are true:
- There are visible cracks, tears, or warping in the rubber. Even hairline fractures harbor mold biofilm that cleaners cannot reach.
- Mold returns within two weeks of a thorough cleaning. Colonies have penetrated the rubber itself.
- The gasket leaks water onto the floor during any cycle. The structural-damage clock is already running.
- The rubber feels slimy or tacky even after cleaning and drying. Bacterial biofilm has bonded to the surface.
Gasket replacement costs in 2026:
- Parts: $50 to $250, depending on brand. Samsung and LG run higher.
- Labor: $75 to $150 for a single-tech job on a standalone unit.
- Stackable units: up to $660 because two technicians are required.
- All-in installed range: $280 to $660.
- A new front-load washer: $700 to $1,800.
In almost every case, replacing the gasket is far cheaper than replacing the machine.
Decision framework by machine age:
- Under 5 years old, first mold issue: replace the gasket.
- 5 to 8 years old, recurring mold: replace the gasket and address laundry-room humidity.
- 8+ years old, leaking, recurring mold: replace the whole machine and consider switching to an HE top-loader.
Warning: A leaking gasket starts a structural-damage clock. Mold can begin colonizing wet drywall and subfloor within 24 to 48 hours. Fix the leak the same week you find it.
If your gasket is leaking or mold keeps returning, the contractors in our network can assess whether the problem has spread to your laundry room floor or walls. Call 941-487-7409 for a free assessment, or use the form on our site.
Step 5: Check if the Mold Has Spread to Your Floor, Subfloor, or Walls
A washer can leak a tablespoon of water a day for months without you noticing. In Sarasota’s humidity, that is enough to colonize the subfloor, the bottom plate of the wall behind the unit, and drywall up to 18 inches above the floor.
Pull the washer away from the wall and inspect. You are looking for:
- Soft or spongy floor when you press firmly behind where the washer was sitting. That is subfloor saturation.
- Dark staining on the floor under the machine. Water has been pooling there.
- Bubbling, peeling, or warped paint on the wall behind the washer. Moisture is wicking up the drywall.
- A musty odor that lingers when the washer is off and the door is closed. The mold is no longer confined to the appliance.
- Rust on the washer’s feet or the lower base panel. Chronic moisture contact.
- Visible mold on baseboards, drywall, or the floor itself.
- Tile grout discoloration or cracking near the unit.
- Drywall that feels soft or crumbly when pressed on the lower 18 inches behind the unit.
 Staining on the baseboard and floor tile near a washer is one of the first visible signs that moisture has spread beyond the appliance.
A note on insurance. Florida homeowners policies cover sudden and accidental events like a burst supply hose. Gradual leaks are excluded under maintenance and negligence clauses, and slow washer leaks fall into that bucket every time. The longer the leak sits, the more of the remediation cost lands on you.
Tip: A $30 moisture meter from any hardware store gives you a real answer in 30 seconds. Press the pins into the floor, the baseboard, and the lower drywall. A reading above 16% means the material is actively wet. Above 20% confirms a mold-growth environment.
Step 6: When to Call a Mold Remediation Professional in Sarasota
DIY ends where the drywall starts. If mold has spread off the appliance and onto building materials, you are past what a homeowner can safely fix — and Florida’s humidity means it will grow back fast if remediation is not done correctly.
Call a professional if any of these are true:
- Mold is visible on drywall, baseboards, or flooring outside the washer.
- The subfloor is soft or spongy anywhere in the laundry room.
- A moisture meter reads above 20% on floor or wall materials.
- The cleaning cycle has not eliminated the smell after two attempts and the gasket is intact.
- Any household member has unexplained respiratory symptoms, asthma flare-ups, or sinus issues that started recently.
- The visible mold area is larger than 10 square feet — that is the EPA’s threshold above which DIY is no longer recommended.
- The washer pan or floor drain is showing standing water.
- The washer is 8+ years old and has never been serviced. The pump or drain hose may be the source of the leak.
Mold remediation costs in the Sarasota market for a contained laundry-room scope run $2,000 to $6,000 ($10 to $25 per square foot). That price covers containment with poly sheeting and negative air pressure, HEPA-filtered air scrubbing during the work, removal of contaminated drywall and flooring, antimicrobial treatment of framing and substrates, structural drying with commercial dehumidifiers, and post-remediation air quality verification.
The contractors in our network are licensed Florida mold remediation specialists serving Sarasota, Bradenton, and Venice. Most inspect at no cost and provide a written scope before any work begins. Call 941-487-7409 or use the form on our site to request a free assessment — the sooner you scope the problem, the smaller it stays.
How to Prevent Washing Machine Mold in Sarasota’s Humidity
The EPA and CDC recommend keeping indoor humidity between 30% and 50%; Sarasota’s outdoor average is 74%. Without active intervention, your laundry room is a mold-growth environment whether or not the washer is involved.
Humidity control starts with the room, not the machine:
- Target 45% to 50% relative humidity. Mold activates above 60%.
- Run the laundry-room exhaust fan during every wash cycle and for 30 minutes after.
- If there is no exhaust fan, a 30-pint portable dehumidifier ($200 range) will pull roughly 2 gallons of water per day out of a Florida laundry room in summer.
- AC sizing matters. Oversized units cool the air fast but dehumidify poorly. If your AC short-cycles on and off every 5 to 10 minutes, it is not pulling enough moisture out of the air.
Washer habits that prevent recurrence:
- Use HE powder detergent rather than HE liquid. Liquid residue is the number-one cause of dispenser mold, and overdosing is rampant.
- Leave the door open 4 to 6 inches between every load.
- Move laundry out of the drum the moment the cycle ends. Wet clothes sitting in a sealed drum is a 90-minute incubator.
- Run a monthly drum-cleaning cycle at the hottest setting.
- Inspect water supply hoses every 6 months and replace them every 3 to 5 years. Burst supply hoses are the single most common cause of catastrophic washer floods.
- Wipe the gasket dry after every load. Thirty seconds of prevention beats a two-hour deep clean.
Tip: A $200 portable dehumidifier in the laundry room can prevent a $3,000+ remediation event. It is the highest-ROI home maintenance purchase you can make in Sarasota’s climate.
Frequently Asked Questions
Can washing machine mold make you sick?
Yes. Aspergillus, Penicillium, and Stachybotrys chartarum can trigger upper respiratory symptoms, asthma flare-ups, and hypersensitivity pneumonitis. Higher-risk groups: children, the elderly, asthmatics, and the immunocompromised.
Why do front-load washers get mold more than top-loaders?
Design. The airtight rubber door gasket traps water in its lower fold after every cycle. Top-loaders drain by gravity and air-dry between uses. Consumer Reports found 17% mold rates on front-loaders versus 3% on top-loaders.
Will running an empty bleach cycle kill the mold?
It kills surface mold but not colonies that have penetrated microscopic cracks in the gasket rubber. If mold returns within two weeks, the gasket itself needs replacement — typically $280 to $660 installed.
Is it safe to use a washer with mold while waiting for a repair?
Wear an N95 when loading and unloading. Do not wash items for infants, the elderly, or anyone with respiratory issues. Open the door fully and step back before reaching in.
Does homeowners insurance cover mold from a washing machine leak?
Usually only if the leak was sudden and accidental, like a burst supply hose. Slow gradual leaks are excluded under the maintenance and negligence clauses in standard Florida policies. Document damage and get a contractor scope before filing.
How often should I clean my washer in Florida?
Run a hot cleaning cycle monthly, wipe the gasket dry weekly, and leave the door open 4 to 6 inches between every load. The 90-day manufacturer guidance is too infrequent for Sarasota’s humidity baseline.
Dealing with water damage in Sarasota?
Describe what happened and a licensed local contractor will call you back — usually within an hour. No cost, no obligation.
Get Your Free Assessment